
Basic Left Hand Position for Beginners
By Jamie Fiste, Professor of Cello at Central Michigan University
Share This
While I advocate for rotation in the left hand, this technique isn't well suited for beginning cellists in a classroom setting. This article covers beginning left hand position that will lay a solid foundation for more advanced technique later in the student's development.
If you are here looking for ways to learn or teach the different positions on the cello fingerboard, please see my 98 etude set in the positions.
A Silly Saying
"Fingers curved, wrist straight, elbow up, and...thumb between 1st and 2nd fingers
(said quickly!)."
This is how I often begin my introduction to the left hand with beginning cellists. This one silly saying captures the primary elements of left hand technique: the fingers, the wrist, the elbow, and the placement of the thumb.
The first three are fairly standard (fingers, wrist, and elbow) but the thumb placement between 1st and 2nd fingers is a bit at variance from tradition.
Let's look at each concept individually.
Fingers Curved
Keeping the fingers curved of beginning cellists is often a challenge! The fingers of younger players, in particular, are often too weak to stay curved and will 'pancake' or become 'platypus fingers' as the joints hyper-extend or flatten. I'll sometimes try to make my point with a little humor by asking my students how well platypuses run. Of course, they are not good runners (albeit good swimmers!). Neither are platypus fingers good for running around the fingerboard!
I find that having students curve their fingers more than usual helps with this. This will mean playing more on the tips than would typically be necessary. This often solves the problem temporarily. A long term solution is finger strengthening to be discussed later in the article.
Drink Your Vegetable Juice!
Another little game is to have the students hold their hands in front of them as if they were holding a glass of juice - how about something nutritious like broccoli juice? Yum! With the pulp! Yuk, they say!
Are you kidding me? It's nutritious and
delicious!
Why not have a little fun with it?
Of course, the idea is to have an capital 'C' in the hand. The students then bring the hand to the fingerboard and place the first finger down with a nice 'C' shape. Some prefer to start with all four fingers down - the 'C' works for either.
If the hand loses it's nice capital 'C', I will say No C sickness please! I've been known to pass out an empty Dramamine box to those who are 'C sick'. Again, why not have a little fun?
Another little trick is to roll up an 8' x 11' piece of paper, tape it so it maintains its roll, and tape it to the side of the neck of the cello with some Scotch tape. I then instruct the beginning cellists to keep a 'C' so as not to touch the paper. This can be helpful when the teacher is not around to keep an eye on things.
Thumb Circles, Tension Kryptonite!
The first time students put their finger(s) down in a 'C' shape, I have them do thumb circles immediately. I want the first experience of depressing the string to be without any
thumb squeezing - zero thumb!.
You know, those pesky thumbs are trouble - and they are hard to see! As my former teacher says, the thumbs are the naughty puppies of cello technique! How true!
I often have beginning students practice thumb circles interspersed throughout the lesson. Not only do thumb circles prevent squeezing, motion is like kryptonite to tension.
Wrist Straight
With all of the cases of carpel tunnel syndrome, it's a no-brainer to keep our wrists straight. Flexing or extending the wrist leads to pressure on the median nerve. Also, we do not want our tendons to have to pass around a corner. Everything works best in the hand, wrist, and arm when the wrist is straight.
The thumb placement may be the culprit of a flexed or extended wrist so keep an eye out for it. If the thumb is too far behind the neck of the cello, the wrist may extend (cock back). If the thumb is too far to the side, the wrist may flex (bend forward).
Elbow Up
How high should the elbow be? I mention 'elbow up' in my corny saying because, in my experience, it is more common for the elbow to be too low than too high in beginning cellists.
It is equally important (maybe more so) that the elbow not be too high. The upper arm should always have some 'down hill' slop. This is much healthier for the shoulder that can suffer rotator cuff injury or subacromial impingement if elbows are over elevated.
Placement of the Thumb
It is tradition to have the left thumb oppose the 2nd finger. Eventually, in more advanced playing, my goal is for the placement of the left thumb be determined by which finger is down. This is especially helpful for vibrato. I find vibrato on first finger to be excessively restricted when the thumb opposes the second finger.
For beginners, however, the thumb is a wonderful reference point for the rest of the fingers so it is best if it has a home. Since the ultimate goal is a dynamic technique(adapting and changing) that does not prescribe a fixed position for the left thumb, I opt for a placement between 1st and second fingers - a sort of compromise.
For me, and I know this is unorthodox, I actually don't fuss too much about the thumb placement as long as the thumb opposes the 1st finger, 2nd finger, or anywhere in between. I am more concerned that the thumb not be placed directly on the pad nor squeeze. The thumb should be placed on the neck of the cello between the pad and the side of the thumb.
If you are of a school of thought that prefers to keep the thumb opposing the 2nd finger, then by all means teach this from the beginning. I find, however, that the knuckle base of the index finger tends to remain flattened if the thumb always opposes the 2nd finger and becomes a source of tension.
Strengthening Fingers
In the mean time, it is important to begin strengthening the fingers so they can maintain their rounded shape without excessive curving. To do this, I like to introduce the 'Mr. Muscle' or 'Ms. Muscle' exercise. Here's how it works...
- Have the students place their 1st finger on the C string, 2nd on G, 3rd on D, and 4th on A.
- While holding the other fingers down, practice lifting the 1st finger up high and bringing it back down with a little percussive sound.
- Repeat this for the 2nd, 3rd, and 4th fingers.
- I'd only start with 5 reps per finger in the beginning, working up to 10 reps later on.
- Don't overdo this - it can be taxing. Stick to 5 reps at first!
- Remember, only one finger lifts while the others stay down.
Getting the Strings Down
It is typical for beginners to think it is the fingers that are primarily responsible for pressing down the strings with the thumb squeezing on the back of the neck. The strength, however, begins in the back - particularly the upper back - and the fingers only transmit
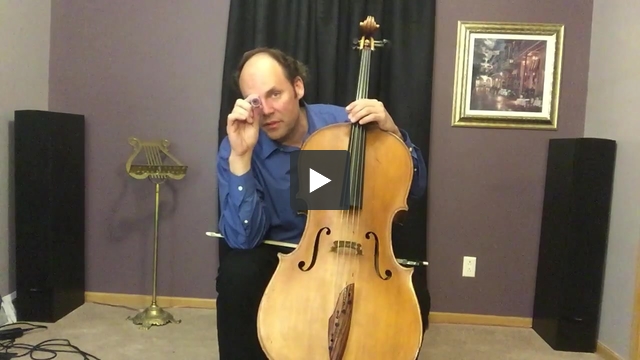
the power.
What I like to do is take my bow and demonstrate a 90 degree angle to the cello fingerboard and strings. This is the direction of power: down and back. The optimal direction of power to bring down the strings is perpendicular to the string, not straight down to the ground
(unless the cello is horizontal to the floor!). This means that the power comes from the upper back, not just from gravity.
So keep an eye out that the upper arm is at a 90 degree angle to the fingerboard. Because we are so accustomed to rounding our shoulder blades forward, cellists elbows often are swung forward, not allowing the upper back to assist. If you get the correct angle and direction of power, the thumb relaxes as well.
And that's how I introduce a basic left hand position for beginning cellists. I hope that helps!
S.D.G.
Authored by Jamie Fiste, Professor of Cello at Central Michigan University.